 Organic Workflow
 Peptide Workflow
 Scale-Up Flash Purification
  Sample Preparation
 Biomolecule Purification
 Oligo synthesis
 Scavengers and Reagents
 Service & Support
 Accessories & Spare parts
 Investors
 Reports & News
 The Share
 Corporate Governance
 Calendar
 Sustainability
 Our Offering
 Our History
 Our Locations
 Leadership
In today’s post I’d like to discuss how you can check your Biotage flash system to ensure it is running smoothly and still performing at the high level and capability that is expected of all Biotage products. I’ll go over how to set up and run the Sfär-TM1 parabens test, what to look for as indicators of the “health” of the system, and what you can do if anything looks amiss.
Is your Isolera or Selekt running at optimal performance? How do you know? When a Biotage Field Service Engineer is assessing the overall health of a system one of the last tests that they will perform is the Sfär-TM1 parabens test, which serves to indicate that all of the individual components of the system (pump, detector, fraction arm, etc) are working together smoothly and seamlessly. We do this after a PM visit (preventative maintenance), an installation, and after repairs. It tells us that the system is functioning properly and that it is ready for you, the customer, to start using. But wouldn’t it be nice to do this test on your own time, so that you can know for sure that the system is performing to specs?
The TM1 test is run under normal phase conditions, with a Biotage® Sfär HC Duo 10g, using hexanes/heptanes and ethyl acetate as your weak and strong solvents. The Sfär-TM1 kit comes with five of these 10g columns and also five preloaded samplets. Prior to the run I like to flush the lines with a strong solvent (usually MeOH, if its accessible) to ensure that I’ve purged any polar solvents, especially water, that may be stuck in the lines. This would be especially needed if you’ve just calibrated the UV detector, which uses DI water, and may have some still remaining in the flow cell. (The TM1 test can also be performed in reverse phase, with a 12g C18 column and a 25-75% methanol/water gradient).
The Setup
To setup your gradient conditions I find that its easiest to use the TLC to gradient option in the Selekt or Isolera software. Set the conditions of the plate according to Figure 1, then select create. Be sure to set the detector to scan for the correct wavelengths (280 and 254nm), and if you have the Spektra software package installed on your system I like to set the λ -all to Show. Turn UV baseline correction to ON, and I also like to use the Collect All function with a maximum fraction volume of ~10ml, depending on what size tubes you have. Doing this will force the fraction collection arm to move to the majority of the collection rack tubes, which will tell me that the arm is calibrated properly. This will also dispense the same amount of liquid into each tube, which tells me that that pump is accurately measuring pumped solvent. You can see how this one simple test gives us a whole heck of a lot of information about the system!
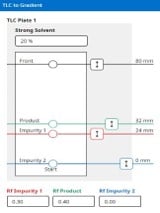 Figure 1: TLC setup for the TM1 test purification. This picture is from a Selekt system, but the Isolera can be set up using the same values
The Run
Start the run as usual, making sure that you equilibrate the column and then insert the loaded parabens samplet when prompted. Do all of your normal pre-run checks, ensuring that solvents are filled, waste is empty, racks are inserted properly, fittings are all tight and secure, etc. As the gradient starts to increase make sure that the baseline UV response remains relatively flat, as this will indicate that the baseline correction is functioning properly. Pressures throughout this run should be low, between 0.5-3.0bar. You should start to see your first peak around the 6-7CV mark, with the second one starting ~2CV’s later. The peaks should be well resolved, and should look similar to the examples in Figure 2.

Figure 2: Three examples of typical peak shape and resolution that you should achieve with your TM1 test. Note that there is some variability with peak height for the different traces, as well as elution times.
The Results
Once the peaks have eluted and the run has finished, how do we then determine if the run was successful and the instrument is performing correctly? To quantitatively determine the result, we will look at the ratio of the two peaks. Using the touch screen, zoom in on each of the two peaks, focusing on the 280nm trace, and note down the response for each individual peak. Then, take the Peak 1 value and divide by the Peak 2 value, this ratio should be 0.85 (±0.15) (see Figure 3).
To assess the result qualitatively, I look at the overall peak shape, making sure there are no shoulders or tailing, and that the traces are all smooth and not jumping around. Take a look at the fractions, are the levels all more or less even? Did the pressure remain steady throughout the run, with minimal bouncing up/down?
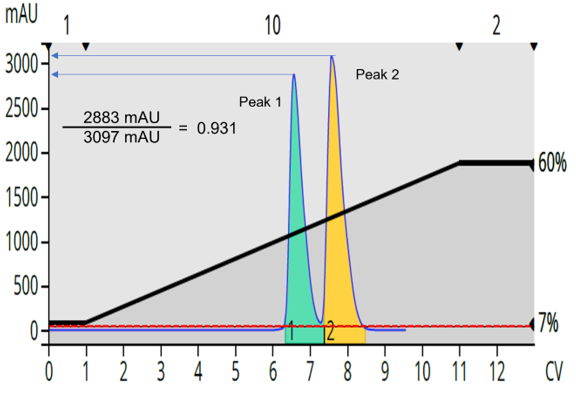
Figure 3: I need to create an image with the two peaks, with measurements and then perhaps the calculations written on the side of the image.
And that’s it! Be sure to allow the run to finish to completion, which allows the final flushes and purges to occur. Now that you have confirmed that your Biotage flash system is running optimally you can rest easy knowing that purifications and sample preps can be completed with confidence. The TM1 test can be run as part of your routine maintenance, or can be used for troubleshooting purposes, and since there are five tests in each kit you’ll have plenty of spares to keep on the shelf.
If you notice anything odd about your results, or would like to speak with a Biotage technical representative about your system, please reach out to our Biotage 1-Point support group by the button below.
Chat With Service
Or for help ordering the Sfär-TM1 parabens test kit please contact Biotage sales below!
Chat With Sales